| subsidized by Umwelt- und Gesundheitsbildungsfonds bm:bwk |
Experimental Work in the DNA Lab
Ms. Dr. Bogengruber arrived at our school at 6:30 in the morning, her car loaded with scientific instruments provided by the department of Molecular Biology of the University of Salzburg. Still a bit sleepy but with great efficiency she organised the unpacking of the instruments and – to our big surprise – did not hesitate to take hands on. That helped us to loose our fear of contact with Ms. Dr. Bogengruber, an internationally respected and successful scientist.
During our project planning we had found out that numerous articles of Ms. Dr. Bogengruber had been published in international magazines.
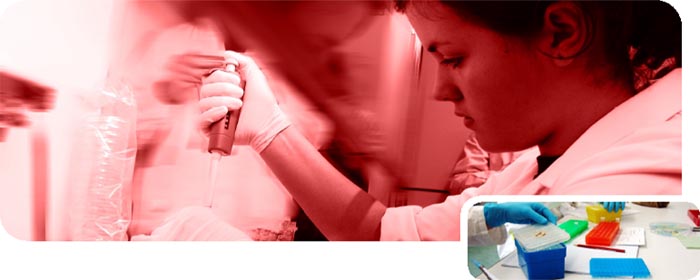
After we had converted our school lab in a high-tech lab according to her instructions, we started our experimental work punctually with the school bell. First, we had to learn basic tasks of a molecular biologist and practiced to use highly precise micropipettes with regular ink, which demanded a lot of motor skills. Ms. Dr. Bogengruber explained the application of the different lab instruments. We soon learned how to use centrifuge, heating block, vortex and of course the very expensive PCR machine.
After we had converted our school lab in a high-tech lab according to her instructions, we started our experimental work punctually with the school bell. First, we had to learn basic tasks of a molecular biologist and practiced to use highly precise micropipettes with regular ink, which demanded a lot of motor skills. Ms. Dr. Bogengruber explained the application of the different lab instruments. We soon learned how to use centrifuge, heating block, vortex and of course the very expensive PCR machine.
There were four steps to be performed:
isolation of (anonymized) DNA from our blood
Ms. Dr. Bogengruber showed us the original protocols of the lab kits, giving instructions how to isolate genetic material from blood. We were a bit worried to see the instructions being written in English and containing numerous technical terms difficult to understand.
But Ms. Dr. Bogengruber explained us the different steps of isolating DNA with simple comparisons to everyday-life. (“It is the same as when you pour lemon juice into milk”, she said, explaining how to isolate protein from blood.)
We soon felt comfortable and self-assured in the lab. Step by step we extracted DNA from our anonymized blood-samples. At least we had to believe it, as we could not see anything due to the minimal quantities used during the entire procedure.Luckily we have a clean-room bench in our school lab, allowing us to work in an absolutely sterile environment. For legal and hygienic reasons this had been a technical requirement for our experiment.
The next step was the polymerase chain reaction (PCR), the amplification of a certain section of our genetic material.
We copied a certain gene called DPD (Dihydropyrimidindehydrogenase), used to decompose the medication 5-FU.
First we learned the technical requirements for a successful PCR reaction and then we used pipettes to add primers, nucleotides, polymerase and buffer to our extracted DNA. Next we placed the reaction mixture in the PCR machine. Here the target-gene was amplified billion-fold.We cleaved the amplified gene with a restriction-enzyme, a DNA cutting enzyme. This was done to distinguish between genetically mutated DNA and DNA without mutations. The restriction-enzyme cleaves the DNA only at certain sequences. Consequently, only mutated genes get cut. This part of the experiment was the easiest to be performed: taking PCR products out of the instrument, adding restriction-enzyme and buffer with a pipette and putting the DNA back into the heating block for 1 to 2 hours at 37 Grad Celsius.
Finally we made the DNA visible, no matter if it had been cut or not. We used the gel electrophoresis, which stains DNA and moves it through a gel-kind substance in an electric field.
During this procedure DNA gets separated according to its size. Smaller DNA fragments migrate faster through the gel substance than longer fragments which may get stuck in the gel.
One team prepared the gel. They weighted agarose, added a special DNA dye, let it cook and poured it - without bubbles - into gel-chambers. We used a plastic comb as spacers for the DNA. After the gel was set we could pipet our DNA samples into the gel slots resulting from removing the plastic comb. This task required a steady hand! We knew if one’s hand slipped, the work of an entire day would be destroyed. But we all succeeded - with more or less shivering hands!
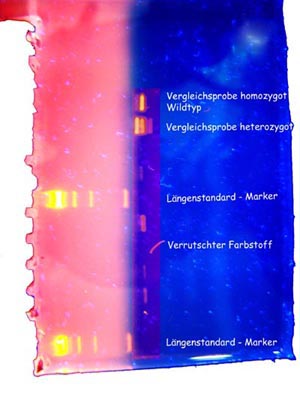
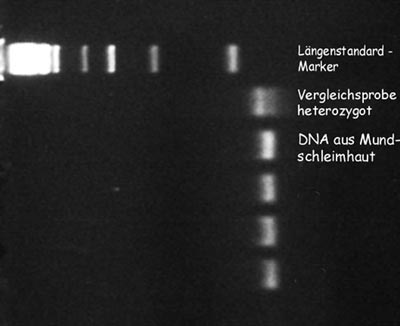
After a day of careful work the result of our experiment was very exciting.Using a so called blue box, sending out light of a certain wave length, the dye connected to the DNA get visible and (nearly) all of us could see meaningful signals of our DNA. Scientists call the signals bands.
Luckily none of us had the mutation. We are therefore so called homozygous wild types. The DNA of three students showed no signals, probably due to a mishap during conducting one of the first working tasks of the experiment.
For comparison Ms. Dr. Bogengruber had organized DNA of an affected patient and we could check our results against mutated DNA. This also confirmed that we had performed the tests correctly as our own homozygous bands were placed at the same location as the wild type sample used for comparison.
For professional disposal we sterilized all instruments and material used in an autoclave at 145°C and 150.000 Pa pressure. This included blood samples, DNA samples, gloves, pipette-tips, etc.
Pharmakogenetik - HBLA Ursprung 2005 |